

Back to Page
Amazon Storefront
How to Make an Amazon Storefront: A Beginner’s Guide
How to Make an Amazon Storefront: A Beginner’s Guide

Back to Page
Amazon Storefront
How to Make an Amazon Storefront: A Beginner’s Guide
TL;DR
Enroll in Amazon Brand Registry to access storefront tools.
Use the Amazon Storefront Builder for easy customization.
Choose a template or design from scratch for your brand.
Add high-quality images, product listings, and branding.
Test, submit for approval, and optimize regularly.
Work with Amazon consultants for expert storefront design.
Setting up an Amazon Storefront is a game-changer for sellers looking to build a brand presence and boost sales. Unlike a regular product listing, a storefront gives you a dedicated space to showcase your brand, tell your story, and create a curated shopping experience for customers. Whether you're launching your first product or scaling an existing business, having an Amazon Storefront can help you stand out in a crowded marketplace.
This beginner-friendly guide will walk you through everything you need to know—from setting up your storefront to designing it for maximum impact. Let’s get started!
Step 1: Sign up for Amazon Brand Registry
Before creating an Amazon Storefront, you must enroll in the Amazon Brand Registry. This program provides brand owners with additional protection against counterfeit products and unauthorized sellers. It also unlocks exclusive tools, including A+ Content, Sponsored Brands, and, most importantly, the ability to create an Amazon Brand Store Design.
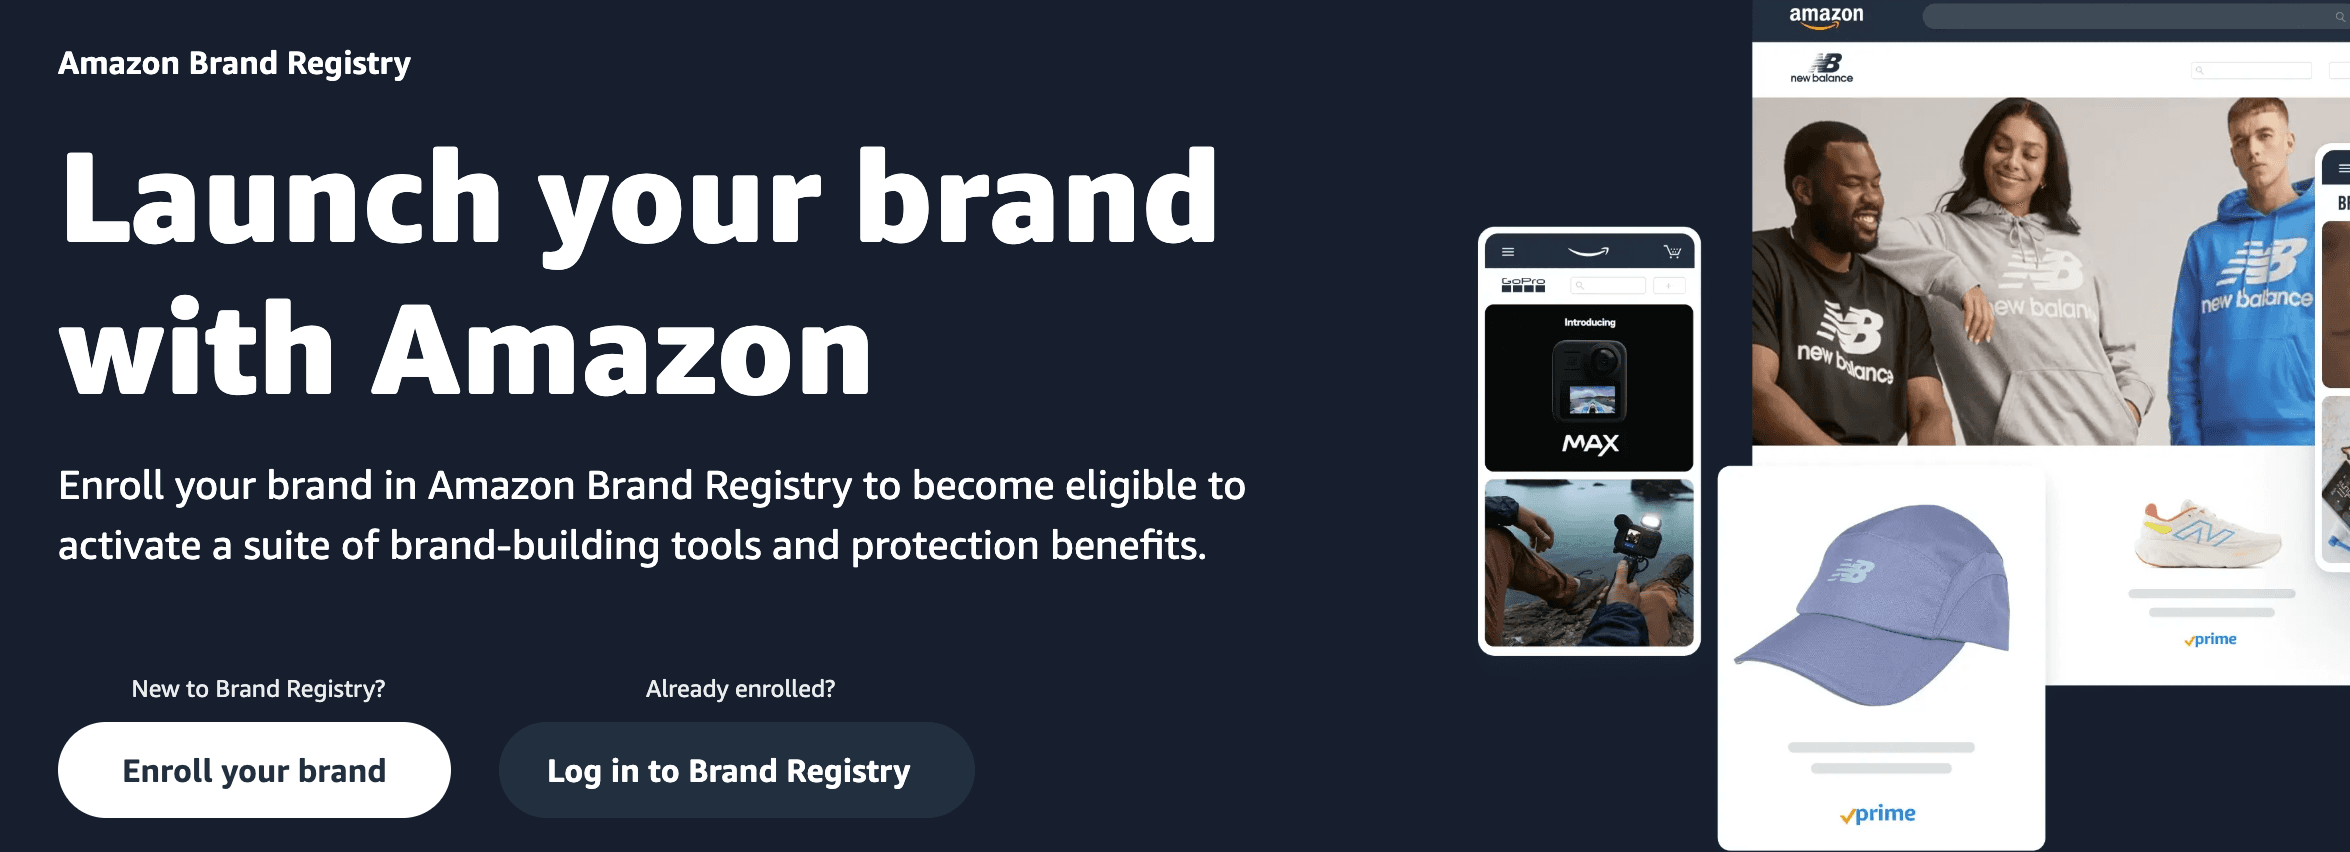
To qualify for the Brand Registry, you need an active trademark for your brand in one of Amazon’s accepted regions. Registration involves submitting your trademark details through Seller Central and verifying your ownership. Once approved, you can access Amazon’s storefront builder and other advanced marketing tools.
Setting up a Brand Registry is a crucial first step, as it not only allows you to build a storefront but also helps establish trust with customers. A professionally designed storefront enhances brand visibility, builds credibility, and provides a curated shopping experience.
Requires an active registered trademark
Grants access to Amazon storefront creation
Provides brand protection and advanced marketing tools
Once enrolled, you can move on to the next step: designing your store and customizing it to reflect your brand identity. This is where you can leverage professional services to create a standout presence.
Step 2: Access the Amazon storefront builder
Once you’re part of the Brand Registry, you can access the Amazon Storefront Designer through Seller Central. Navigate to the “Stores” section under the Advertising tab. This tool allows you to create a customized, multi-page shopping experience for your brand without needing coding or technical skills.

When you open the storefront builder, you’ll see various customization options, including pre-designed templates and drag-and-drop modules for adding images, text, and videos. You can create a homepage, category pages, and dedicated product pages. Each section can be tailored to highlight your brand’s identity and best-selling products.
If you’re new to store design, an Amazon consulting firm can help optimize your layout for better conversions. These experts understand Amazon’s best practices and can ensure your store is visually appealing, easy to navigate, and optimized for sales.
Access the storefront builder via Seller Central
Customize layout using templates and drag-and-drop tools
Work with an Amazon consulting firm for expert design advice
Setting up a visually appealing storefront is essential for branding and conversions. Next, you’ll choose a template or design from scratch to make your store unique.
Step 3: Choose a template or start from scratch
Amazon offers various storefront templates to make the design process easy. These templates come with pre-arranged sections that allow you to simply drag and drop images, product listings, and brand descriptions. If you prefer full creative control, you can start with a blank template and design your store from the ground up.

A well-structured storefront is crucial for keeping customers engaged. You’ll need to consider layout, navigation, and overall aesthetics. If you don’t have experience with store design, investing in Amazon store design services can be beneficial. These services help sellers create a polished, user-friendly storefront that enhances the shopping experience.
Your store should be designed to highlight your best-selling products while also reinforcing your brand identity. The homepage should include a strong hero image, clear navigation, and featured product sections.
Choose from Amazon’s pre-designed templates
Customize using drag-and-drop functionality
Consider Amazon store design services for a professional touch
Once you’ve selected your template or designed your layout, it’s time to start branding your storefront by adding logos, banners, and other visual elements.
Step 4: Add your brand logo and banner images
Your storefront should immediately reflect your brand identity. The best way to do this is by uploading a high-resolution brand logo and eye-catching banner images. These elements help create a professional and trustworthy image while giving your store a cohesive look.
Your logo should be prominently placed at the top of your store. Banner images should showcase your products in action, highlight your brand’s story, or promote seasonal offers. Amazon allows you to add multiple banners across different pages of your store, so use them strategically.
When uploading images, follow Amazon’s quality guidelines to ensure they display correctly across desktop and mobile devices. High-resolution images that load quickly will enhance the customer experience and encourage engagement.
Upload a high-resolution brand logo
Use high-quality banner images to enhance branding
Follow Amazon’s size and quality guidelines
Visual branding is a key factor in creating a successful storefront. Once your brand’s look is in place, the next step is to organize your products into logical categories to improve navigation.
Step 5: Create and organize product categories
A well-organized storefront makes shopping easy for customers. If your store layout is cluttered or confusing, visitors may leave without making a purchase. To prevent this, group similar products into logical categories so customers can quickly find what they’re looking for.
For example, if you sell kitchen products, you might create separate categories for cookware, utensils, and storage. If you offer multiple product lines, make sure each has its section with clear images and descriptions.

Amazon allows you to create multiple pages within your storefront, so use this feature to your advantage. A well-structured store improves user experience, increases conversion rates, and makes your brand look more professional.
Group similar products into clear categories
Make navigation simple and intuitive
Improve user experience to increase sales
With your categories in place, the next step is to add detailed product listings with images, descriptions, and pricing.
Step 6: Add product listings with images and descriptions
Each product in your storefront should have high-quality images, detailed descriptions, and compelling bullet points that highlight its benefits. Listings should be informative yet concise, making it easy for customers to understand what they’re purchasing.
Your product descriptions should focus on key features, benefits, and unique selling points. Use high-resolution images that showcase the product from multiple angles. If possible, include lifestyle images that show your product in real-world use.
Make sure all product listings comply with Amazon’s guidelines to avoid listing suppression or other issues. A well-optimized product page increases customer trust and boosts sales.
Use high-resolution images with multiple views
Write clear, compelling product descriptions
Follow Amazon’s listing guidelines for best results
Now that your products are added, it’s time to fine-tune your store layout with engaging text and multimedia elements.
Step 7: Customize the layout with text and multimedia
Now that your storefront structure is in place, it’s time to enhance it with engaging content. Amazon allows you to add text sections, images, and videos to tell your brand’s story, explain product benefits, and create a more immersive shopping experience.
Videos are particularly effective in driving engagement. You can use them to demonstrate product usage, showcase unique features, or share customer testimonials. Text sections should be concise yet informative, guiding visitors through your brand’s value proposition.
If you want a polished, high-converting layout, consider working with Amazon store design services. These professionals can help ensure that your storefront is visually appealing, user-friendly, and optimized for conversions.
Add engaging text to highlight brand and product benefits
Use videos to demonstrate product features and increase engagement
Work with Amazon store design services for a professional look
A well-structured layout improves customer experience and encourages more purchases. Once your storefront is customized, you’ll need to preview and test it before submitting it for approval.
Step 8: Preview and test your storefront
Before submitting your Amazon storefront for approval, it’s crucial to preview and test it thoroughly. This ensures that everything functions correctly, images display properly, and navigation is smooth for customers.
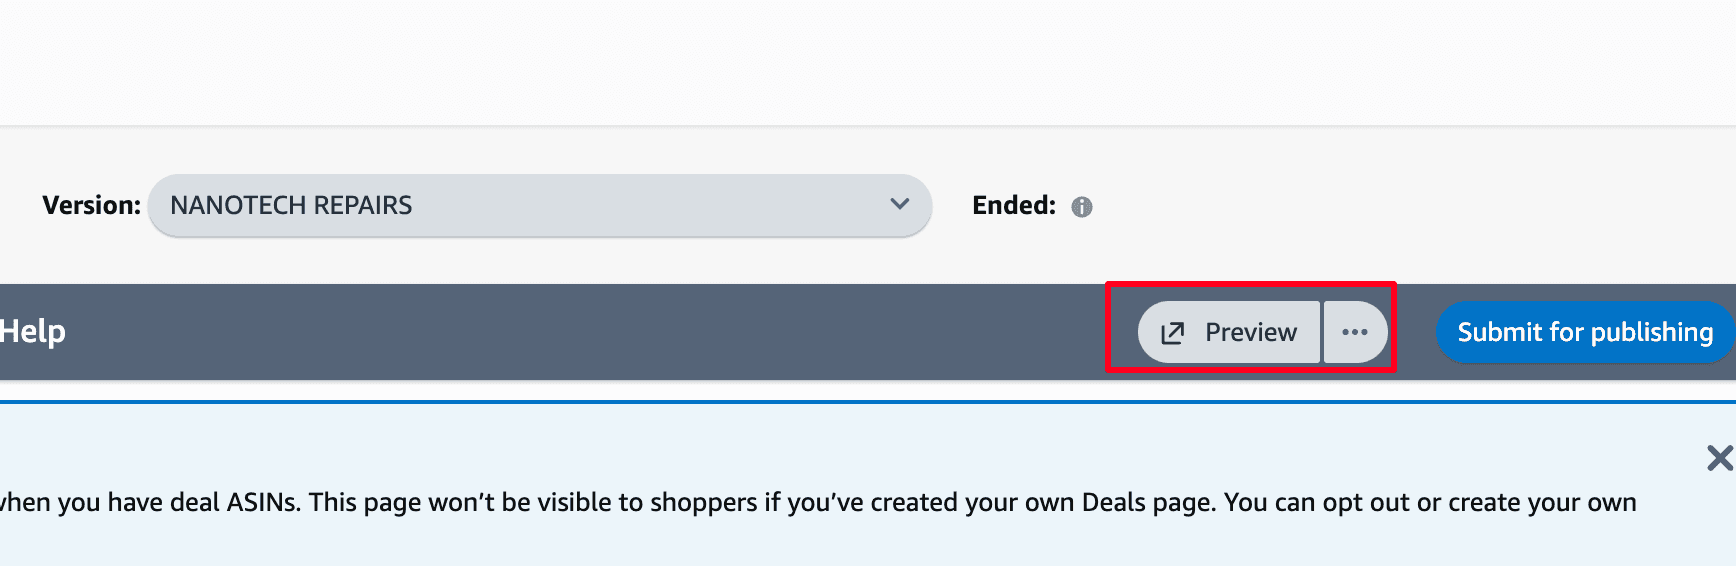
Start by reviewing your store’s layout on both desktop and mobile devices. Check for misaligned images, broken links, or missing product listings. Make sure all text is formatted correctly and that buttons and links work as expected.
Test the customer journey by clicking through different product categories and adding items to the cart. A seamless experience increases the likelihood of conversions. If you notice any issues, go back to the storefront editor and make adjustments.
Preview your storefront before submitting
Check for broken links, misaligned images, and missing content
Test navigation and user experience on different devices
Once you’re satisfied with how everything looks and functions, the next step is to submit your store for Amazon’s review.
Step 9: Submit for approval and go live
After finalizing your storefront, you’ll need to submit it for Amazon’s approval. The review process typically takes a few days, during which Amazon ensures that your store meets its guidelines. If any issues are found, you may need to make revisions before your storefront is approved.
Amazon checks for compliance with branding, image quality, and content guidelines. If your store gets rejected, review Amazon’s feedback carefully and make the necessary edits before resubmitting.
Once your storefront is approved, it will go live, and customers will be able to explore your brand’s dedicated space on Amazon. A professional Amazon storefront designer can help refine details and ensure that your store meets all the necessary criteria for approval.
Submit your store for Amazon’s review
Revise and resubmit if necessary
The store goes live after approval
With your storefront live, the final step is to monitor performance and continuously optimize for better results.
Step 10: Monitor performance and make updates regularly
Launching your storefront is just the beginning. To maximize its potential, you need to track its performance and make data-driven improvements. Amazon provides built-in analytics tools that show key metrics such as visitor traffic, conversion rates, and sales trends.
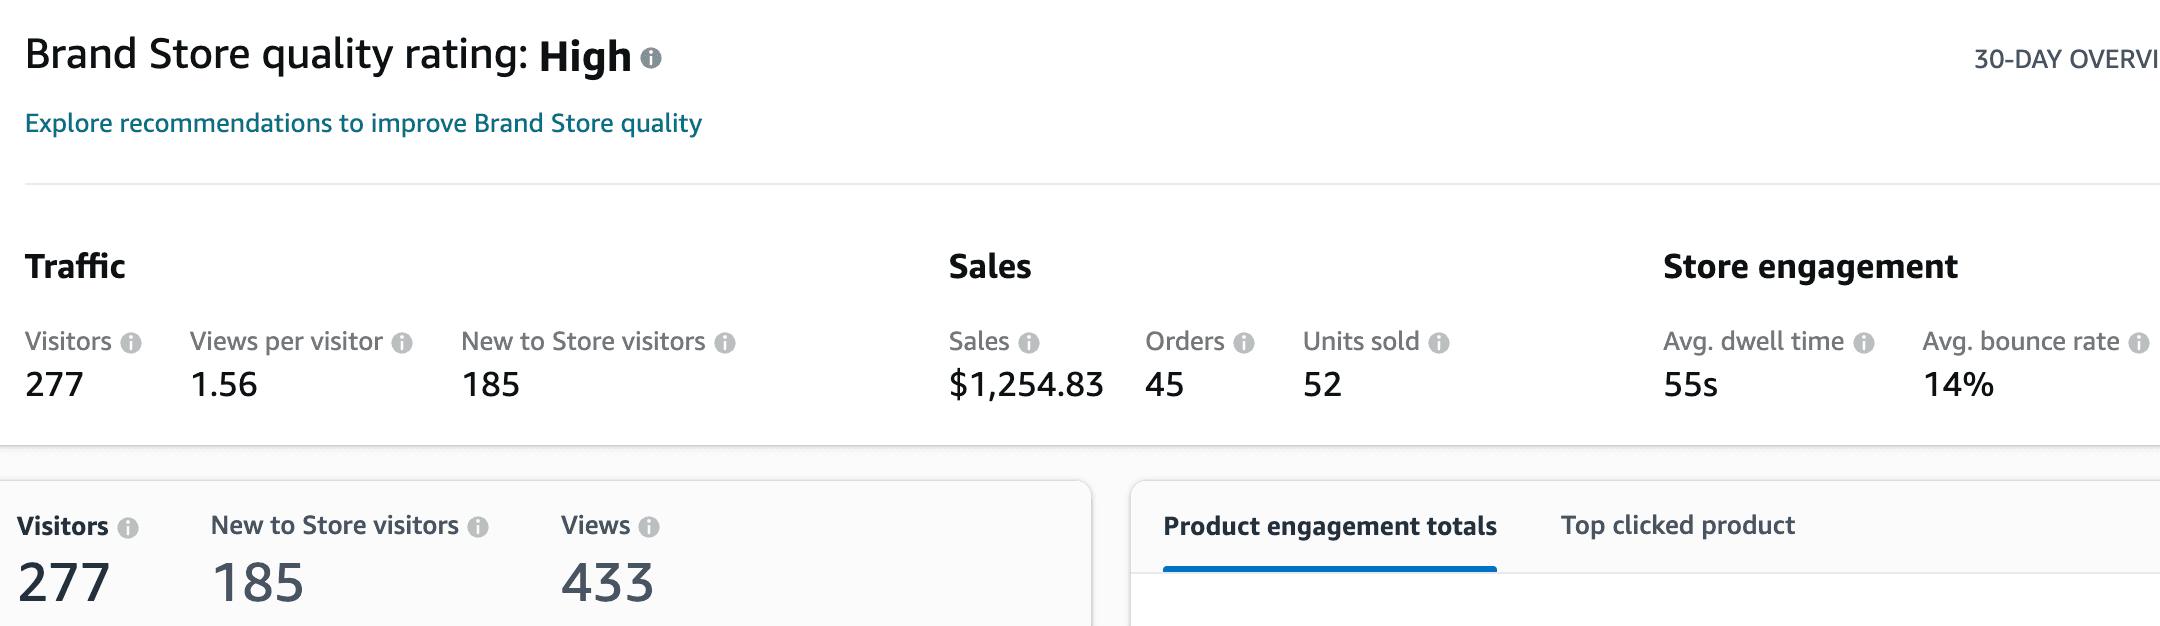
Regular updates help keep your storefront fresh and engaging. You can modify banners for seasonal promotions, update product listings with new arrivals, and refine content based on customer feedback. Keeping your store dynamic encourages repeat visits and boosts brand credibility.
For long-term success, many sellers partner with an Amazon consulting firm to analyze performance data and implement strategies for continuous improvement. Experts can help optimize layout, adjust product placements, and refine branding elements to enhance customer engagement.
Track store performance with Amazon’s analytics tools
Update content regularly to keep your storefront fresh
Work with an Amazon consulting firm for ongoing optimization
Continuously monitoring and refining your storefront ensures that it remains competitive and provides a top-tier shopping experience.
Final thoughts
Building an Amazon storefront helps establish your brand, boost sales, and create a seamless shopping experience. But success doesn’t stop at launch—regular updates and strategic tweaks keep your store competitive. Working with Amazon consultants can help optimize your storefront for maximum impact. Start today and make your brand stand out!
TL;DR
Enroll in Amazon Brand Registry to access storefront tools.
Use the Amazon Storefront Builder for easy customization.
Choose a template or design from scratch for your brand.
Add high-quality images, product listings, and branding.
Test, submit for approval, and optimize regularly.
Work with Amazon consultants for expert storefront design.
Setting up an Amazon Storefront is a game-changer for sellers looking to build a brand presence and boost sales. Unlike a regular product listing, a storefront gives you a dedicated space to showcase your brand, tell your story, and create a curated shopping experience for customers. Whether you're launching your first product or scaling an existing business, having an Amazon Storefront can help you stand out in a crowded marketplace.
This beginner-friendly guide will walk you through everything you need to know—from setting up your storefront to designing it for maximum impact. Let’s get started!
Step 1: Sign up for Amazon Brand Registry
Before creating an Amazon Storefront, you must enroll in the Amazon Brand Registry. This program provides brand owners with additional protection against counterfeit products and unauthorized sellers. It also unlocks exclusive tools, including A+ Content, Sponsored Brands, and, most importantly, the ability to create an Amazon Brand Store Design.
To qualify for the Brand Registry, you need an active trademark for your brand in one of Amazon’s accepted regions. Registration involves submitting your trademark details through Seller Central and verifying your ownership. Once approved, you can access Amazon’s storefront builder and other advanced marketing tools.
Setting up a Brand Registry is a crucial first step, as it not only allows you to build a storefront but also helps establish trust with customers. A professionally designed storefront enhances brand visibility, builds credibility, and provides a curated shopping experience.
Requires an active registered trademark
Grants access to Amazon storefront creation
Provides brand protection and advanced marketing tools
Once enrolled, you can move on to the next step: designing your store and customizing it to reflect your brand identity. This is where you can leverage professional services to create a standout presence.
Step 2: Access the Amazon storefront builder
Once you’re part of the Brand Registry, you can access the Amazon Storefront Designer through Seller Central. Navigate to the “Stores” section under the Advertising tab. This tool allows you to create a customized, multi-page shopping experience for your brand without needing coding or technical skills.
When you open the storefront builder, you’ll see various customization options, including pre-designed templates and drag-and-drop modules for adding images, text, and videos. You can create a homepage, category pages, and dedicated product pages. Each section can be tailored to highlight your brand’s identity and best-selling products.
If you’re new to store design, an Amazon consulting firm can help optimize your layout for better conversions. These experts understand Amazon’s best practices and can ensure your store is visually appealing, easy to navigate, and optimized for sales.
Access the storefront builder via Seller Central
Customize layout using templates and drag-and-drop tools
Work with an Amazon consulting firm for expert design advice
Setting up a visually appealing storefront is essential for branding and conversions. Next, you’ll choose a template or design from scratch to make your store unique.
Step 3: Choose a template or start from scratch
Amazon offers various storefront templates to make the design process easy. These templates come with pre-arranged sections that allow you to simply drag and drop images, product listings, and brand descriptions. If you prefer full creative control, you can start with a blank template and design your store from the ground up.
A well-structured storefront is crucial for keeping customers engaged. You’ll need to consider layout, navigation, and overall aesthetics. If you don’t have experience with store design, investing in Amazon store design services can be beneficial. These services help sellers create a polished, user-friendly storefront that enhances the shopping experience.
Your store should be designed to highlight your best-selling products while also reinforcing your brand identity. The homepage should include a strong hero image, clear navigation, and featured product sections.
Choose from Amazon’s pre-designed templates
Customize using drag-and-drop functionality
Consider Amazon store design services for a professional touch
Once you’ve selected your template or designed your layout, it’s time to start branding your storefront by adding logos, banners, and other visual elements.
Step 4: Add your brand logo and banner images
Your storefront should immediately reflect your brand identity. The best way to do this is by uploading a high-resolution brand logo and eye-catching banner images. These elements help create a professional and trustworthy image while giving your store a cohesive look.
Your logo should be prominently placed at the top of your store. Banner images should showcase your products in action, highlight your brand’s story, or promote seasonal offers. Amazon allows you to add multiple banners across different pages of your store, so use them strategically.
When uploading images, follow Amazon’s quality guidelines to ensure they display correctly across desktop and mobile devices. High-resolution images that load quickly will enhance the customer experience and encourage engagement.
Upload a high-resolution brand logo
Use high-quality banner images to enhance branding
Follow Amazon’s size and quality guidelines
Visual branding is a key factor in creating a successful storefront. Once your brand’s look is in place, the next step is to organize your products into logical categories to improve navigation.
Step 5: Create and organize product categories
A well-organized storefront makes shopping easy for customers. If your store layout is cluttered or confusing, visitors may leave without making a purchase. To prevent this, group similar products into logical categories so customers can quickly find what they’re looking for.
For example, if you sell kitchen products, you might create separate categories for cookware, utensils, and storage. If you offer multiple product lines, make sure each has its section with clear images and descriptions.
Amazon allows you to create multiple pages within your storefront, so use this feature to your advantage. A well-structured store improves user experience, increases conversion rates, and makes your brand look more professional.
Group similar products into clear categories
Make navigation simple and intuitive
Improve user experience to increase sales
With your categories in place, the next step is to add detailed product listings with images, descriptions, and pricing.
Step 6: Add product listings with images and descriptions
Each product in your storefront should have high-quality images, detailed descriptions, and compelling bullet points that highlight its benefits. Listings should be informative yet concise, making it easy for customers to understand what they’re purchasing.
Your product descriptions should focus on key features, benefits, and unique selling points. Use high-resolution images that showcase the product from multiple angles. If possible, include lifestyle images that show your product in real-world use.
Make sure all product listings comply with Amazon’s guidelines to avoid listing suppression or other issues. A well-optimized product page increases customer trust and boosts sales.
Use high-resolution images with multiple views
Write clear, compelling product descriptions
Follow Amazon’s listing guidelines for best results
Now that your products are added, it’s time to fine-tune your store layout with engaging text and multimedia elements.
Step 7: Customize the layout with text and multimedia
Now that your storefront structure is in place, it’s time to enhance it with engaging content. Amazon allows you to add text sections, images, and videos to tell your brand’s story, explain product benefits, and create a more immersive shopping experience.
Videos are particularly effective in driving engagement. You can use them to demonstrate product usage, showcase unique features, or share customer testimonials. Text sections should be concise yet informative, guiding visitors through your brand’s value proposition.
If you want a polished, high-converting layout, consider working with Amazon store design services. These professionals can help ensure that your storefront is visually appealing, user-friendly, and optimized for conversions.
Add engaging text to highlight brand and product benefits
Use videos to demonstrate product features and increase engagement
Work with Amazon store design services for a professional look
A well-structured layout improves customer experience and encourages more purchases. Once your storefront is customized, you’ll need to preview and test it before submitting it for approval.
Step 8: Preview and test your storefront
Before submitting your Amazon storefront for approval, it’s crucial to preview and test it thoroughly. This ensures that everything functions correctly, images display properly, and navigation is smooth for customers.
Start by reviewing your store’s layout on both desktop and mobile devices. Check for misaligned images, broken links, or missing product listings. Make sure all text is formatted correctly and that buttons and links work as expected.
Test the customer journey by clicking through different product categories and adding items to the cart. A seamless experience increases the likelihood of conversions. If you notice any issues, go back to the storefront editor and make adjustments.
Preview your storefront before submitting
Check for broken links, misaligned images, and missing content
Test navigation and user experience on different devices
Once you’re satisfied with how everything looks and functions, the next step is to submit your store for Amazon’s review.
Step 9: Submit for approval and go live
After finalizing your storefront, you’ll need to submit it for Amazon’s approval. The review process typically takes a few days, during which Amazon ensures that your store meets its guidelines. If any issues are found, you may need to make revisions before your storefront is approved.
Amazon checks for compliance with branding, image quality, and content guidelines. If your store gets rejected, review Amazon’s feedback carefully and make the necessary edits before resubmitting.
Once your storefront is approved, it will go live, and customers will be able to explore your brand’s dedicated space on Amazon. A professional Amazon storefront designer can help refine details and ensure that your store meets all the necessary criteria for approval.
Submit your store for Amazon’s review
Revise and resubmit if necessary
The store goes live after approval
With your storefront live, the final step is to monitor performance and continuously optimize for better results.
Step 10: Monitor performance and make updates regularly
Launching your storefront is just the beginning. To maximize its potential, you need to track its performance and make data-driven improvements. Amazon provides built-in analytics tools that show key metrics such as visitor traffic, conversion rates, and sales trends.
Regular updates help keep your storefront fresh and engaging. You can modify banners for seasonal promotions, update product listings with new arrivals, and refine content based on customer feedback. Keeping your store dynamic encourages repeat visits and boosts brand credibility.
For long-term success, many sellers partner with an Amazon consulting firm to analyze performance data and implement strategies for continuous improvement. Experts can help optimize layout, adjust product placements, and refine branding elements to enhance customer engagement.
Track store performance with Amazon’s analytics tools
Update content regularly to keep your storefront fresh
Work with an Amazon consulting firm for ongoing optimization
Continuously monitoring and refining your storefront ensures that it remains competitive and provides a top-tier shopping experience.
Final thoughts
Building an Amazon storefront helps establish your brand, boost sales, and create a seamless shopping experience. But success doesn’t stop at launch—regular updates and strategic tweaks keep your store competitive. Working with Amazon consultants can help optimize your storefront for maximum impact. Start today and make your brand stand out!


eStore Factory is a full-service Amazon agency dedicated to building end-to-end strategies for brands of all sizes.


SERVICES FOR AMAZON
Product Setup ON AMAZON
GRAPHICS & BRANDING SERVICES
© Copyright 2014 - 2025. All Rights Reserved.
eStore Factory is a full-service Amazon agency dedicated to building end-to-end strategies for brands of all sizes.
SERVICES FOR AMAZON
Product Setup ON AMAZON
GRAPHICS & BRANDING SERVICES
© Copyright 2014 - 2025. All Rights Reserved.
eStore Factory is a full-service Amazon agency dedicated to building end-to-end strategies for brands of all sizes.
SERVICES FOR AMAZON
Product Setup ON AMAZON
GRAPHICS & BRANDING SERVICES
© Copyright 2014 - 2025. All Rights Reserved.